The CryptKi Guides
How to send and receive crypto safely
Sending and receiving crypto can feel simple. You paste an address, enter an amount, confirm, and the blockchain does exactly what you told it to do.
Except the transaction goes to the wrong address. Or the right address on the wrong network. Or it never goes through because you didn't have the right asset to pay the fees.
Sending and receiving is not technically difficult. But it requires a level of attention that the interface never asks of you. Every step has a place where something can go silently wrong, and once a transaction is confirmed, there is no undo.
This guide walks you through both processes: how to receive crypto safely, and how to send it without making the mistakes that cause real losses. You may be using a personal wallet, a centralized exchange, or a broker. The interface may differ, but the underlying rules are the same.
👉 If some of these concepts are still unclear, start here first:
→ What is a crypto wallet?
→ Keys, addresses, and seed phrases (basics)
→ Crypto transactions: how they work

Before you start: the two questions that matter
Every transfer, whether you are sending or receiving, depends on the same two things.
What asset
Not all cryptocurrencies are the same. USDT is not USDC. ETH is not BNB. Names can look familiar but represent different assets.
If you receive the wrong one, you may not be able to use it where you intended.
On what network
The same asset can exist on multiple blockchains. USDT exists on Ethereum, Tron, Solana, Arbitrum, and others. The name stays the same. The network does not.
An Ethereum address looks identical whether it is used on Ethereum mainnet, Arbitrum, or Base, but those are different networks.
If the sender and receiver are not aligned, the transaction can succeed while creating a problem on arrival.
These two questions must be clear before anything is sent. If either is unclear, stop and confirm before proceeding.
Part 1 — Receiving crypto
Receiving feels passive. You share an address and wait.
But the important decisions happen before anything is sent.
Step 1. Select the correct wallet, asset, and network
Open your wallet or platform and go to "Receive". If your setup includes multiple accounts or addresses, make sure you are using the correct one.
Then check the asset and the network. Many interfaces allow you to switch between networks. The address may look correct while pointing to a different context than expected.
👉 Example: you want to receive USDC on Ethereum, but the sender selects Arbitrum because the address looks the same. The funds may still arrive to an address you control, but on a different network than expected. This can create confusion, additional steps, or limitations depending on the wallet or platform used.
Always verify the network before sharing your address.
Step 2. Copy or display your address carefully
Once you have confirmed the correct asset and network, copy your address or display the QR code.
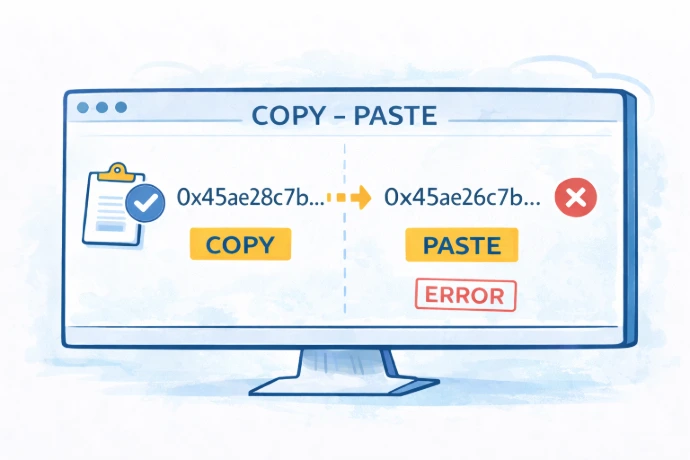
If you copy the address as text, paste it and verify it after. Some malware can replace clipboard content silently.
A quick visual check is enough to catch most issues. Look at the beginning, a few characters in the middle, and the end.
If you use a QR code, the risk is lower but not zero. The code still represents an address that could be wrong at the source.
⚠️ Always verify what you share, regardless of the method.
Step 3. Align with the sender
Before anything is sent, confirm the asset and the network together. Say it explicitly. Do not assume.
If the sender is using a platform (CEX or broker), they may be offered several network options for the same asset. Make sure the one they select matches what you expect to receive.
👉 Simple rule: agree on both the asset name and the network name before the transfer is sent.
Step 4. Wallet vs platform: not the same rules
Receiving on a personal wallet and receiving on a platform follow different rules.
A personal wallet usually gives you a direct address. Share it, and the funds arrive.
A platform often comes with additional instructions. This can include a specific network requirement, a minimum deposit amount, or an additional identifier such as a memo or a tag. These instructions are not optional.
If you are receiving on a platform, read those instructions fully before sharing anything.
⚠️ Sending to a platform address without following its specific instructions can result in funds that arrive but are not credited to your account automatically.
Step 5. Memo, tag, or reference
Some transfers require more than an address, particularly when receiving on a platform (CEX or broker).
When a memo, destination tag, or reference is required, this identifier allows the platform to match the incoming transaction to your specific account.
If it is missing or incorrect, the funds may arrive at the platform but not be credited to you automatically. Recovering them in that situation is possible but involves a manual process that is not guaranteed to be fast or free.
When receiving on a personal wallet, the address is usually enough. When a platform is involved, always check if something else is required before sharing your address.
Step 6. Wait and verify the transaction
Once the transfer is sent, it may take time to appear.
Different networks process transactions at different speeds. Most transactions on Ethereum or its layer 2 networks arrive within seconds to a few minutes. Bitcoin transactions typically take longer. Many exchanges wait for several confirmations before crediting a deposit.
A transaction that does not appear immediately is not necessarily lost.
Check your wallet or platform. If needed, look up the transaction using a blockchain explorer by searching for your address or the transaction ID provided by the sender.
⚠️ Do not ask the sender to resend before checking the transaction status. Sending twice creates a different problem.
Part 2 — Sending crypto
Sending requires more decisions than receiving. Each one matters.
Step 1. Make sure you have the fee asset
Before doing anything else, check that you have enough of the network's native coin to pay for the transaction.
On Ethereum, fees are paid in ETH. On Solana, in SOL. On Tron, in TRX. This applies regardless of what you are sending.
If you want to send USDC on Ethereum, you need ETH to pay the fee.
👉 Example: you hold USDC on Ethereum and want to send it. Your ETH balance is zero. The transaction cannot be executed. Your USDC is temporarily unusable on that network until you acquire some ETH.
Fee amounts vary depending on the network and its current activity level. On Ethereum, fees can be significant during busy periods. On networks like Arbitrum, Base, or Polygon, they are generally much lower.
Step 2. Select the correct account, asset, and network
Open the "Send" section of your wallet or platform.
Before entering any address, confirm that the correct account, asset, and network are selected.
Many errors happen at this stage simply because the wrong account or network was active. On many interfaces, the default network may not be the one where your funds are located.
Step 3. Enter and verify the recipient address
Enter the recipient address or scan the QR code. Then verify it carefully after entering it.
Do not rely only on the first and last characters. Some malicious addresses are specifically crafted to match both. Check several characters in the middle as well.
Some scams rely on addresses that look familiar in your transaction history. Always copy the address from the original trusted source, not from a previous transaction list.
If you pasted the address, compare it against the original source before proceeding.
⚠️ A blockchain transaction does not verify intent. It delivers to the address you confirmed, exactly. An address that is almost correct is an address that is wrong.
Step 4. Confirm the network matches on both sides
Before proceeding, confirm that the network selected in your wallet matches the network the recipient expects to receive on.
The same address format can be used across several networks. An Ethereum-style address works on Ethereum, Arbitrum, Base, Optimism, and many others.
If you send on Arbitrum and the recipient is expecting funds on Ethereum mainnet, the funds will arrive on Arbitrum.
👉 Simple rule: always confirm the network with the recipient before sending.
Step 5. Send a test transaction first
If the amount is significant or the address is new, send a small amount first.
This confirms that the address is correct and the network is right.
You also see if the funds arrive as expected and if the fees are acceptable before sending the full amount.
👉 Example: you want to send 500 USDC to a new address. You send 1 USDC first. It arrives. Then you send the rest.
⚠️ A test transaction is not excessive caution. It is the cheapest form of confirmation available.
Step 6. Review before confirming
Before confirming, your interface shows at least a summary: the recipient address, the amount, the network, and the estimated fees.
Check the asset, network, recipient address, amount, fee, and memo or tag if one is required.
Read it. All of it.
If anything looks different from what you intended, stop and go back. Do not assume it will be fine.
Once you confirm, the transaction is broadcast to the blockchain. It cannot be reversed.
⚠️ The confirmation screen is the last moment where you can stop.
Step 7. Sending from a platform
If you are sending from a platform (CEX or broker), the process may differ from a personal wallet in ways that are not always obvious.
The platform may support only certain networks for a given asset, add its own fees, or present network names differently from what the recipient expects.
Before sending, make sure the selected network matches what the recipient is expecting.
👉 If you want the full process step by step, see: How to move crypto off an exchange.
Step 8. Check the transaction status
After confirming, your transaction may appear as pending.
You can follow its progress in your interface or through a blockchain explorer.
If something looks wrong, do not resend immediately. Check the transaction status first.
A pending transaction is not a lost one.
A note on testnets
Some wallets also support test networks used for testing. Assets there have no real value, and real mainnet assets do not become testnet assets.
If you have ever enabled one, always check the network label before sending or receiving anything valuable.
👉 The network label in your wallet is what matters.
A final note
Wallet interfaces, blockchain tools, and platform procedures change over time. The guidance in this article reflects common practices, but your specific wallet, platform, or network may work differently.Before taking action, always verify the current steps through official documentation and trusted sources relevant to your situation.
Never rely on a single source when the consequences are irreversible.
Key takeaways
- Every transfer depends on the asset and the network
- Always verify the network before sharing or sending
- You need the network's native coin to pay transaction fees
- Some platforms require a memo, tag, or reference
- Always verify addresses carefully, including the middle characters
- A test transaction is the safest way to confirm everything
- The confirmation screen is your last point of control
Find out more on CryptKi Academy
-
Keys, addresses, and seed phrases (basics)
To understand what a wallet address really is and what gives you control. -
Crypto transactions: how they work
To understand what a transaction really is, how confirmations work, and why mistakes are hard to reverse. -
Wrong network or wrong chain: common mistakes
To see why similar asset names and similar address formats can still create real losses. -
Using your wallet safely
To reduce the habits that create unnecessary risk during everyday use. -
Malware, keyloggers and clipboard hijacking
To understand how copied addresses and other sensitive data can be altered before you notice.
CryptKi Academy full index - Browse all articles
Glossary - Check the definition of all specific terms
Every transaction depends on the wallet behind it.
Explore hardware wallets, seed phrase backups, and accessories that support safer self-custody habits.